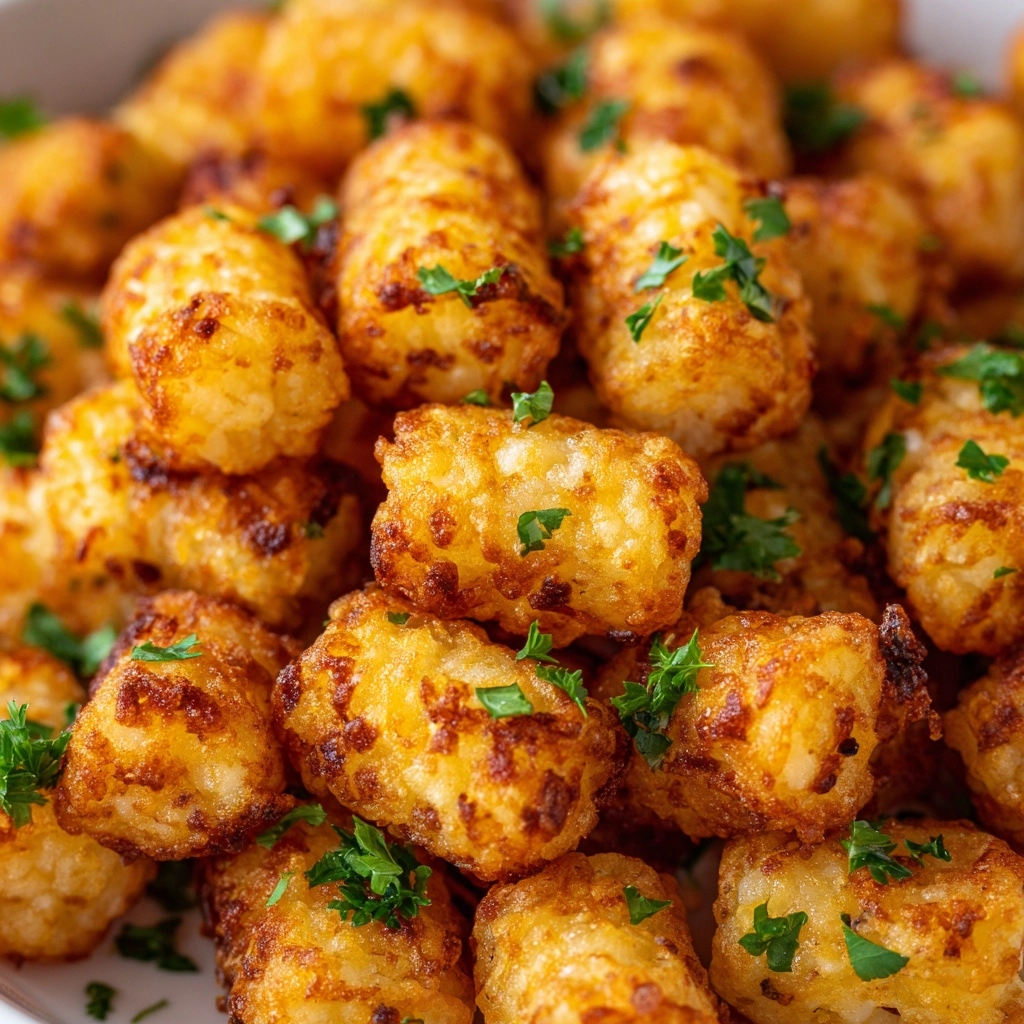
If you’ve ever dreamed of making crispy, golden potato bites from scratch, Homemade Tater Tots are your ticket to snack-time stardom. These little potato pillows are everything you love about classic tots—crunchy on the outside, fluffy inside, and packed with savory flavor—but infinitely better because you made them yourself. Whether you’re feeding a crowd, treating the kids, or simply craving a nostalgic bite, this recipe brings all the satisfaction of your favorite comfort food with an irresistible homemade touch.

Ingredients You’ll Need
With just a handful of basics, you can transform humble potatoes into something truly special. Each ingredient plays a distinct role, ensuring your Homemade Tater Tots taste as good as any you remember—maybe even better.
- Russet potatoes (2 pounds, peeled): The starchy, fluffy base that gives tots their signature interior texture.
- All-purpose flour (1 tablespoon): Binds the potatoes together, helping the tots hold their shape while frying.
- Garlic powder (1 teaspoon): Adds a subtle savory depth that makes each bite extra tasty.
- Onion powder (1 teaspoon): Offers gentle sweetness and a touch of umami, enhancing the overall flavor.
- Salt (1/2 teaspoon): Essential for seasoning the potatoes and bringing all the flavors into focus.
- Black pepper (1/2 teaspoon): Adds just the right amount of warmth and peppery kick.
- Chopped fresh parsley (2 tablespoons, optional): For a pop of color and a touch of fresh, herbal brightness.
- Vegetable oil (for frying): Ensures a perfectly crisp, golden crust on every tot. Don’t skimp here!
How to Make Homemade Tater Tots
Step 1: Parboil the Potatoes
Start by placing your peeled russet potatoes in a pot of cold, salted water. Bring them to a gentle boil and cook for about 6 to 7 minutes. What you’re aiming for is a potato that’s just starting to soften around the edges but still firm in the center—this is the secret to getting that fluffy interior without everything turning mushy. Once they’re ready, drain and let them cool until you can handle them comfortably.
Step 2: Shred the Potatoes
When they’ve cooled down a bit, grab a box grater and shred the potatoes into a large bowl. This is where the magic starts: the shreds will create that signature tot texture. Don’t worry if some pieces are a little chunkier—variety gives your Homemade Tater Tots a great bite!
Step 3: Season and Mix
Add the all-purpose flour, garlic powder, onion powder, salt, pepper, and parsley (if you like a little green in your tots) to the shredded potatoes. Gently toss everything together until the mixture is evenly coated. Try not to overmix—just enough to combine without breaking up the potatoes too much.
Step 4: Shape the Tots
Now for some hands-on fun! Scoop out tablespoon-sized portions of the mixture and gently form them into small cylinders. Don’t worry if they’re not perfectly uniform—homemade means character, and each tot will have its own personality.
Step 5: Fry to Crispy Perfection
Pour about 2 inches of vegetable oil into a deep skillet or heavy pot and heat it to 375°F. Once the oil is shimmering, add your tater tots in batches (don’t overcrowd the pan!) and fry, turning occasionally, until each one is beautifully golden brown and crisp—usually about 3 to 4 minutes. Use a slotted spoon to transfer the finished tots to a paper towel-lined plate to drain any excess oil.
How to Serve Homemade Tater Tots

Garnishes
For a finishing touch, sprinkle your Homemade Tater Tots with a little extra fresh parsley or even a dash of flaky sea salt while they’re still warm. If you’re feeling bold, try a dusting of smoked paprika or a grating of parmesan for an extra layer of flavor that takes them over the top.
Side Dishes
These tots are the perfect sidekick to just about any meal. Serve them alongside a juicy burger, pair them with sandwiches, or even nestle them next to a pile of scrambled eggs for an irresistible breakfast-for-dinner situation. Their crispy exterior and pillowy inside make them a guaranteed crowd-pleaser wherever they land on the plate.
Creative Ways to Present
If you want to have some fun, turn your Homemade Tater Tots into a loaded appetizer bar. Think nacho-style: layer them with cheese, scallions, and a dollop of sour cream. Or skewer them for kid-friendly party snacks. You can even tuck them into sliders for a playful twist on classic comfort food.
Make Ahead and Storage
Storing Leftovers
If you find yourself with extra Homemade Tater Tots (a rare but happy occasion), let them cool completely before transferring to an airtight container. Store them in the refrigerator for up to 3 days. They’ll stay crisp and delicious with just a quick reheat.
Freezing
Want to get ahead of the game? Shape your tots and freeze them on a baking sheet until solid, then transfer to a zip-top bag. When a craving strikes, you can fry them directly from frozen or bake them for an easy weeknight treat. They’ll keep well in the freezer for up to 2 months.
Reheating
To bring back that fresh-from-the-fryer crispiness, spread leftover tots on a baking sheet and bake in a 400°F oven for 10 minutes, flipping halfway through. You can also pop them in the air fryer for a few minutes to revive their crunch. The microwave works in a pinch, but you’ll lose that signature texture.
FAQs
Can I use a different type Side Dish
You can, but russet potatoes are ideal for Homemade Tater Tots because of their high starch content and fluffy texture. Yukon Golds will work in a pinch, but waxy potatoes like red or fingerlings won’t give you that classic tot bite.
Is it possible to bake instead of fry?
Absolutely! For a lighter take, arrange your shaped tots on a parchment-lined baking sheet, spray with a bit of oil, and bake at 425°F for 20 to 25 minutes, flipping halfway through. They’ll turn out beautifully golden and crisp, just with a little less oil.
Can I add cheese or other flavors to the mix?
Definitely! Feel free to experiment by mixing in shredded cheddar, chopped chives, or even a pinch of cayenne for some heat. Just keep the ratio balanced so your tots hold together when cooked.
What’s the best dipping sauce for Homemade Tater Tots?
Classic ketchup is always a winner, but don’t stop there. Try spicy mayo, ranch, honey mustard, or even a tangy barbecue sauce. The crispy, savory tots are the perfect canvas for all your favorite dips.
How do I prevent my tots from falling apart during frying?
The key is to parboil the potatoes just enough—you want them to be soft but not mushy. Also, be gentle when mixing and shaping, and make sure your oil is hot enough before you start frying. If the mixture feels too loose, add a bit more flour to help them hold their shape.
Final Thoughts
Homemade Tater Tots are pure comfort food joy, and making them yourself is easier—and more rewarding—than you might think. Whether you’re serving them up at a party or sneaking a few as a late-night treat, these tots are guaranteed to disappear fast. Give them a try, and I promise you’ll never look at the frozen kind the same way again!
Print
Homemade Tater Tots Recipe
- Prep Time: 25 minutes
- Cook Time: 20 minutes
- Total Time: 45 minutes
- Yield: 6 servings
- Category: Side Dish
- Method: Frying
- Cuisine: American
- Diet: Vegetarian
Description
Homemade Tater Tots are crispy, golden-brown potato cylinders made from shredded russet potatoes mixed with simple seasonings and lightly fried to perfection. They serve as a delicious, kid-friendly side dish or snack that can be enjoyed with ketchup or any favorite dipping sauce. This classic American recipe is easy to prepare and perfect for parties or casual meals.
Ingredients
Potatoes and Seasonings
- 2 pounds russet potatoes, peeled
- 1 tablespoon all-purpose flour
- 1 teaspoon garlic powder
- 1 teaspoon onion powder
- 1/2 teaspoon salt
- 1/2 teaspoon black pepper
- 2 tablespoons chopped fresh parsley (optional)
For Frying
- Vegetable oil for frying (about 2 inches deep)
Instructions
- Parboil the Potatoes: Place peeled potatoes in a pot of cold, salted water and bring to a boil. Cook for about 6 to 7 minutes until they are slightly softened but not fully cooked. Drain the potatoes and allow them to cool until easy to handle.
- Shred the Potatoes: Using a box grater, shred the partially cooked potatoes into a large bowl carefully to maintain their texture.
- Mix Ingredients: Gently combine the shredded potatoes with the flour, garlic powder, onion powder, salt, black pepper, and chopped parsley if using. Mix thoroughly but gently to avoid crushing the potatoes.
- Form Tater Tots: Scoop tablespoon-sized portions of the potato mixture and shape them into small cylindrical tots with your hands.
- Heat the Oil: Pour about 2 inches of vegetable oil into a deep skillet or pot and heat it to 375°F (190°C).
- Fry the Tots: Fry the tater tots in batches, turning occasionally, for about 3 to 4 minutes each batch until they turn golden brown and crispy.
- Drain and Serve: Transfer the fried tots to a paper towel-lined plate to drain excess oil. Serve hot with ketchup or your favorite dipping sauce.
Notes
- You can freeze the shaped tots before frying for quick snacks later.
- For a healthier version, bake the tots at 425°F for 20 to 25 minutes, flipping halfway through.
- Alternatively, air fry at 400°F for 12 to 15 minutes until crispy.
Nutrition
- Serving Size: 6–8 tots
- Calories: 210
- Sugar: 1g
- Sodium: 300mg
- Fat: 10g
- Saturated Fat: 1.5g
- Unsaturated Fat: 7g
- Trans Fat: 0g
- Carbohydrates: 27g
- Fiber: 2g
- Protein: 3g
- Cholesterol: 0mg


